
Before you start
- AI Notes is not the same as Notes, where you write your own note.
- Your account may need the Video & Voice Scribe add-on. If it does, you’ll see a message asking you to add it.
- Get your client’s consent before you record.
- To record in person, use Chrome, Edge or Safari.
Steps
In-person session
- Open the appointment and select Record session. Record this session opens, and says the audio is transcribed and turned into a draft note you review.
- Tick the box confirming your client has given verbal consent to being recorded and transcribed, and that they can ask for it to be deleted at any time. Start recording stays greyed out until you do.
- Use Pause and Resume if you need to. Discard throws the recording away.
- Select Stop & save. Keep the tab open while it uploads.
Video session
- Go to Settings → AI Notes. Under Auto-recording, choose Auto-record all my meetings. The other option, Don’t auto-record my meetings, is the one you start on.
- Under Recording options, keep Audio and Transcription on — audio is what the transcript is made from. Video is off by default and uses considerably more storage.
- Under AI visibility on video calls, choose whether your client sees the badge for the whole session (Show clients an AI Active badge) or only gives consent at the start (Keep the badge off the client’s screen).
- Select Save.
- When your client joins, they are asked to consent, and recording only starts once they accept. You can pause it at any time during the call.
Review and save
- Open the client and select the Session recordings tab. Each row shows the service, the date, and where the recording, transcript and AI summary have got to. Select the row to open it.
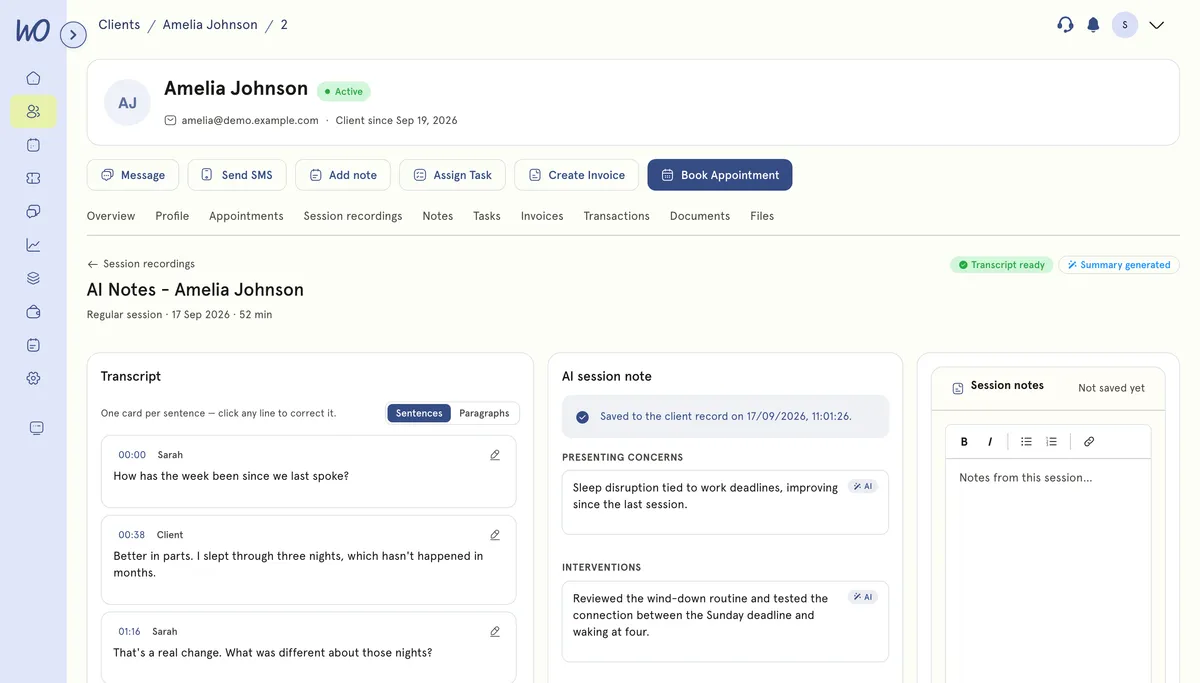
- The page is headed AI Notes with the client’s name, and shows Transcript ready once the transcript is done. Play the audio from the bar at the top.
- Correct the transcript on the left. Sentences puts one card per line so you can click a line and fix it; Paragraphs reads it straight through. Select Save transcript when it is right.
- Select Generate AI summary in the middle. It drafts the note from the transcript for you to review and edit before it reaches the client record.
- Check each statement. Select the pencil to edit one, then select Save.
- Select Save to client record, then confirm.
Your own Session notes sit in the panel on the right, tagged to the client and that date, and save on their own as you type.
What happens next
The note is saved to the client record. Saving signs it off as an accurate record of the session. Any AI text you didn’t change is included as written.
Good to know
- AI-written statements have a badge. It disappears once you edit the statement.
- Some statements say “Low confidence — check the transcript before signing this off.” Click the statement’s timestamp to jump to that moment in the transcript.
- Each time you generate or regenerate a summary, it counts towards your plan’s AI note limit. The limit is 5 on Freemium and 20 on Starter. Growth and Professional have no limit.
- Recordings are health data, so they are always deleted in the end — there is no keep forever. Under Retention choose 30 days, 60 days, 90 days (the default) or Delete once the summary is saved, which keeps the transcript and summary but drops the audio and video as soon as you save the note.
- Auto-join on invite starts you in the session when you open a call from an invite link.