
Before you start
- Workflows don’t send anything yet. Saving and switching on a workflow means it’s checked on a schedule and the activity log records what it would have done. Nothing reaches a client. See Get started with workflows.
- There’s no autosave. If you try to leave with unsaved changes, you’ll be asked Leave without saving? Your changes will be lost.
- To assign or share a document in a workflow, it needs to be in your document library first.
Steps
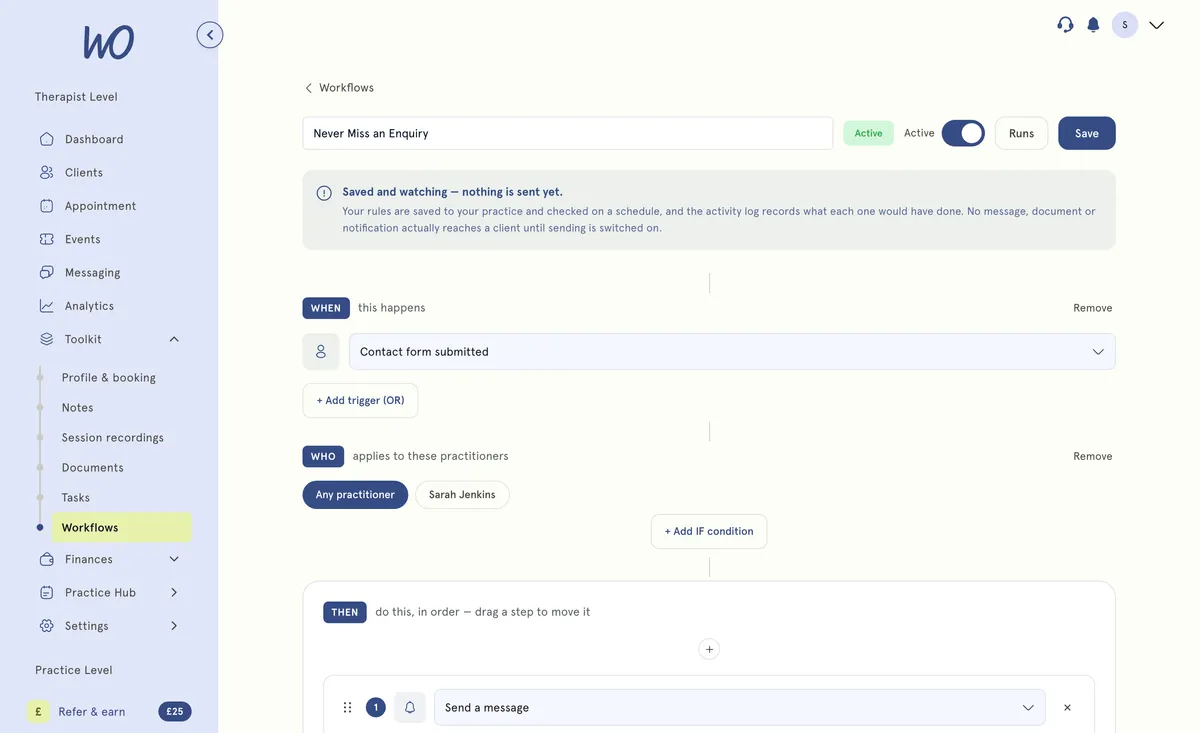
- In the sidebar, open Toolkit and select Workflows. Select New workflow. To change an existing workflow, select its name in the list instead.
- At the top, replace Untitled workflow with a name you’ll recognise.
- Select + Add WHEN trigger and choose the event that starts the workflow. To start it from more than one event, select + Add trigger (OR). Any one of them starts it.
- Optional: select + Add IF condition to limit when it runs. Choose a field, how to compare it, and a value.
- Under THEN, select + and choose Take an action, Check a condition or Wait. Fill in the step’s settings.
- Add more steps with + Add action, or with the + between two steps to insert one there. Steps run in order. To move one, drag it by its handle.
- To switch the workflow on now, turn on Active. Otherwise it saves as a Draft.
- Select Save. You go back to the list, with a message that the workflow was created or saved.
Remove a section The WHEN and WHO sections have Remove beside their heading. To remove a single trigger, condition or step, select × beside it.
Delete the workflow Open it and select Delete workflow at the bottom, then confirm.
Triggers (WHEN)
- New client added
- Contact form submitted — an enquiry through your contact form
- Client inactive 30+ days — 30 days since their last session
- Document assigned — a document shared with a client
- Document not completed by due date — a document you sent is still unsigned three days after you sent it
- Session booked
- Session marked delivered
- Session delivered, no next booking
- Booking cancelled or no-show
- Nth session reached — runs on every delivered session. Add a Session number condition to pick which one, such as is exactly 6.
- Invoice issued
- Invoice overdue
- Package down to 1 session
- Every morning (scheduled) — once a day, from 6am in your practice’s time zone
Conditions (IF)
Conditions you can use include Client tag (New, Returning or Inactive), Practitioner, Days since last visit, Document type, Completion status, Days overdue, Appointment status, Practice location and Session number.
Only the fields your trigger can check are offered. For example, Days overdue is there for Invoice overdue but not for Session booked. If you pick several triggers, you’ll see only the fields all of them can check.
- Conditions in one group must all be true (+ Add condition (AND)).
- To allow a different set, select + Add condition group (OR). The workflow goes ahead if any group is true.
Steps you can add (THEN)
Actions
- Assign a document — choose the Document, Due within (days) and Assign to
- Send a message — choose a Template (channel is fixed per template) and when to Send
- Notify practitioner/staff
- Escalate to manager — who to escalate to, and after how many days overdue
- Mark task complete
- Create a task — a Task title, who to assign it to (Practitioner or Client), Due within (days) and a Description. Under Attach something (optional) you can add one of Share a document, Request an upload, Link a resource, Checklist or Questionnaire.
Checks Check a condition adds an ONLY IF step. If it isn’t true, the workflow stops there and the steps below don’t run.
Waits Wait adds Wait before next step, in hours or days.
Branches Under an action, + Add IF branch adds an extra action that only happens when a condition is true (THEN ALSO). If the condition isn’t true, the branch is skipped and the workflow carries on.
Fix This workflow isn’t ready to save
When something is missing, select Save and a list appears above the builder. The usual ones:
- Give the workflow a name.
- Pick at least one trigger.
- Add at least one action under THEN.
- Enter a number for… — a number field in a condition, check or step is empty.
- … can’t be checked when the trigger is … — that condition doesn’t work with your trigger. Pick a different condition, or a different trigger.
What happens next
- The workflow is saved to your practice. If it’s Active, it’s checked every 15 minutes and each match appears in the activity log with what it would have done. See Check workflow activity.
- For an existing workflow, Runs at the top shows the activity for just that workflow.
Good to know
- A workflow can have up to 10 triggers, 10 condition groups of up to 10 conditions each, 25 steps, and 5 branches on a step.
- An ONLY IF check tests what was true when the workflow first matched. A check after a wait doesn’t see anything that changed during the wait.
- There’s no test run, manual run or duplicate button.
- Workflows don’t use the WHO section (Any practitioner or a name) yet. Whatever you choose, a workflow checks everything in your practice.
- Create a task here is separate from Use tasks to keep track of work. While workflows don’t run for real, no task is created.
- In Send a message, the list shows your practice’s own messages. Workflows don’t recognise those names yet, so the step is skipped and the activity log says No template matches …. A message that came with a template is recognised, even though it shows (unavailable) — keep it.
Troubleshooting
A choice shows (unavailable). The saved value isn’t offered any more — for example, a document you’ve since deleted, or a trigger that has been withdrawn. Pick another, then save. The exception is a message that came with a template: leave it, because workflows recognise it.
A condition shows (can’t be checked for this trigger). Change the condition or the trigger. The workflow can’t be saved as it is, because it would never run.
The document list says No documents in your library yet. Add the document under Toolkit → Documents, then come back and choose it. See Send a document or form to a client.
I lost my changes. The builder doesn’t autosave. Select Save before you leave the page.