
Before you start
- Publish at least one service and set your working hours. New booking only lists published services and available times.
Steps
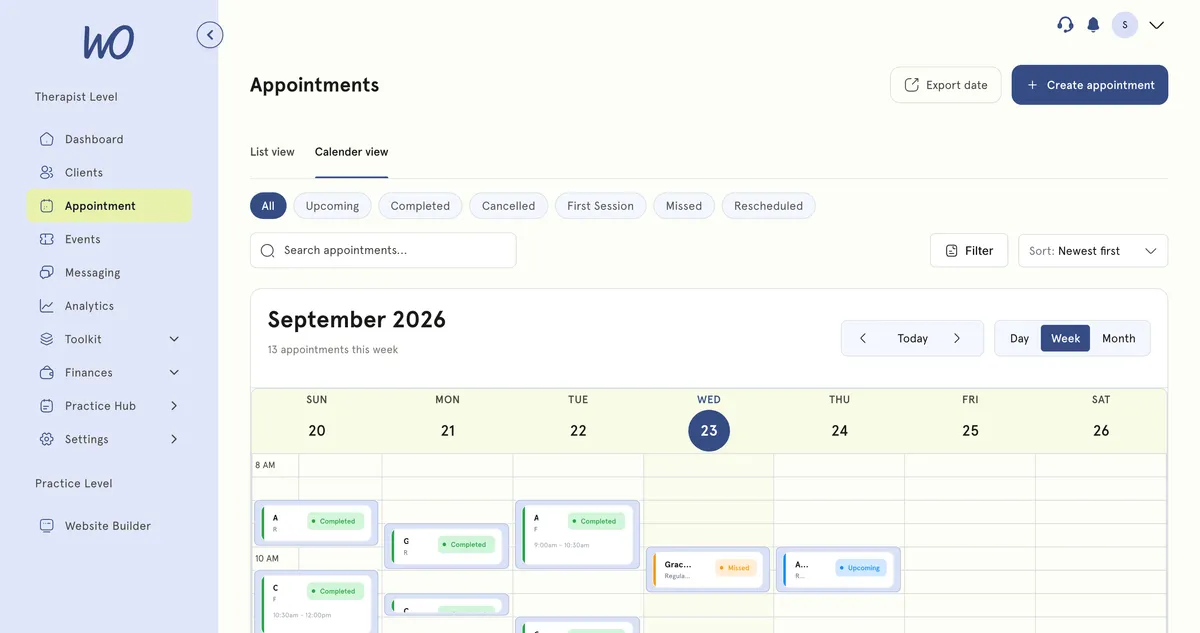
Book an appointment
- In the sidebar, select Appointment.
- Select Create appointment. New booking opens, in four steps.
- Under Who’s the booking for?, choose the client from Select a client, or select Add new client. That opens Quick add client — just First name, Last name, Phone number (optional) and Email. You can fill in the rest of their profile later. Select Next.
- Under Choose a service, select the service. Each one shows its length and price. Select Next.
- Under When & where?, pick a day, then one of the Available time slots. Select Next.
- Under Review & confirm, check the details. Send confirmation email is on by default, which emails the client their appointment details.
- Select Confirm booking.
Reschedule
- Open the appointment. Select it in Calender view, or select its row in List view.
- In Appointment details, select Reschedule. The same window has View Profile, View Invoice, Record session and Cancel appointment.
- Choose a Date, Start time and End time, then select Reschedule.
Cancel
- Open the appointment and select Cancel appointment.
- Select Cancel session to confirm, or Keep session to go back.
Cancelling from a row’s menu in List view asks Cancel this appointment? instead, with Cancel appointment and Keep appointment.
What happens next
- Booked: you’ll see Session successfully created! If the email was on, the client gets a confirmation email.
- Rescheduled: the client gets an email with the new date, time and location, plus a calendar update.
- Cancelled: the client gets an email and a calendar cancellation. You can’t undo this. If the session was part of a bundle, it goes back into the client’s bundle.
Emails are only sent if the client has an email address on their account.
Good to know
- You can only reschedule or cancel upcoming appointments.
- Cancelling does not refund the client. If they have paid, refund the invoice itself from Finances → Invoices.
- You can reword the emails your clients get. Edit them under Email Template in Settings.
- When you reschedule, you can’t pick a past date, and the end time must be after the start time.
- Rescheduling blocks clashes with your other appointments, including buffer and travel time. It doesn’t check your working hours.
- In List view, you can also reschedule or cancel from a row’s actions menu.
- Bookings always start from Create appointment. Selecting an empty slot in the calendar does not open the booking form.
- Connected external calendars are updated when you reschedule or cancel.
Sessions not held on video
MyWellOps marks a session as completed only when you end it in a MyWellOps video call. A session held any other way, such as in person or on the phone, shows as missed about an hour after it ends. The client is also sent a We missed you at your session email.
If you see clients in person, you can stop that email. Open Settings, select Email Template, and switch Appointment No-Show off. See Set up email reminders for how the template list works.
Finding an appointment
- The tabs across the top filter the list: All, Upcoming, Completed, Cancelled, First Session, Missed and Rescheduled.
- Search appointments… finds one by client.
- The Sort menu changes the order. It starts on Newest first.
- Export date at the top right downloads the list as a CSV. It exports what the list is showing, so clear filters first if you want everything.