
Before you start
- Create the event first. See Create an event.
- To sell paid places, connect Stripe. See Connect Stripe so clients can pay online. Free events don’t need Stripe.
- Publishing needs the Retreats & Events add-on to be on.
Steps
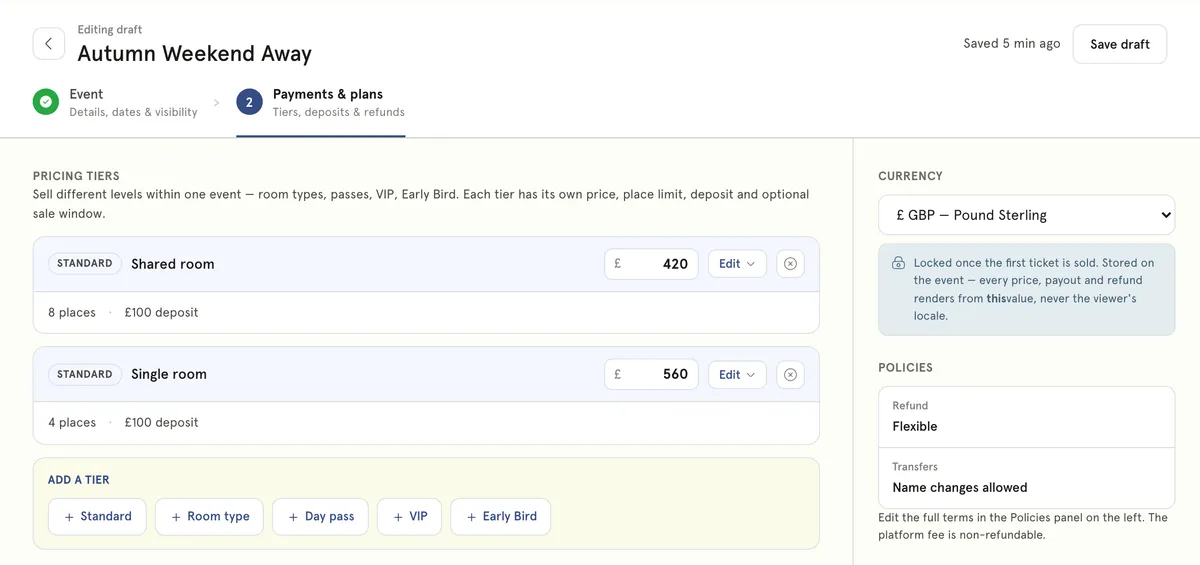
- Open your event. On Events, select Drafts, then the event. Select Continue to Payments & plans, or the Payments & plans step at the top.
- Under Free or paid, choose Free event or Paid event.
Add pricing tiers 3. A Standard tier is already there. Select Edit on it to set:
- Tier name and Price.
- Place limit. Leave it blank for no limit. It can’t be higher than the event’s capacity.
- Deposit option, to let people pay a deposit for this tier (see below).
- Short description.
- For Early Bird pricing, turn on Sale window and set On sale from and Until. The tier hides by itself after the end date.
- To add another tier, under ADD A TIER select Standard, Room type, Day pass, VIP or Early Bird. Each starts with an example price and place limit, so change them.
Add extras 6. Under Optional extras, select + Add an extra. Enter a name, choose per place or per booking, and enter a price. Every extra needs a name, or the event won’t save.
Take a deposit 7. Turn on Deposits & billing. 8. Under How much is the deposit?, choose Fixed amount (per place) or % of price. 9. Under When is the balance due?, enter how many days before the event starts. Then choose Send a payment link or Auto-charge saved card. 10. Under If the balance isn’t paid on time, choose your reminders, a grace period in days, and what happens after it. The options are explained below.
Set your policies 11. Under Refund policy, choose Flexible, Moderate, Strict or Custom. For Custom, write your own terms. 12. Under Cancellation & transfers, choose Name changes allowed, Move to a future event or No transfers.
Publish 13. Select Publish event. 14. If something’s missing, you’ll see Not quite ready to publish with the first thing to fix. Fix it and select Publish event again. 15. If it’s a paid event and Stripe isn’t ready, you’ll see Connect Stripe to publish this event. Select Connect Stripe to set it up. Your event is saved as a draft, and you come back to it afterwards. Or select Make it a free event instead.
What happens next
- You’ll see “Event published — it’s live on your booking page.” and the event’s dashboard opens.
- The event appears where you chose to list it. See Manage event attendees, balances and cancellations for what to do as bookings come in.
How deposits and balances work
- Deposits only apply to tiers with Deposit option on. A tier’s own deposit amount is used if you set one. If you leave it blank, the event deposit is used.
- At checkout the attendee chooses Pay in full or Pay a deposit. Extras are paid with the deposit, so only the rest of the tier price is left as the balance.
- The deposit option disappears once the balance due date is less than a day away. From then on, attendees pay in full.
- The balance is due the number of days you chose before the event starts.
- Send a payment link. The confirmation email says what’s due and when, and links to the attendee’s booking, where they can pay. The reminders include the link too.
- Auto-charge saved card. The card used for the deposit is charged on the due date. If that fails, the booking becomes overdue and follows your overdue rules.
If a balance isn’t paid on time
- Remind before due date emails the attendee 7 days and 1 day before the balance is due.
- Chase after it’s overdue emails them once a day through the grace period.
- When the grace period ends, your rule runs:
- Release the place and Cancel & forfeit deposit both cancel the booking, keep the deposit, free the place and offer it to the waitlist. The attendee is emailed that their place has been released and the deposit isn’t refunded.
- Flag for manual review cancels nothing. The booking shows as Needs review and stays in Deposits outstanding on the dashboard for you to handle.
- MyWellOps checks balances every few minutes, so these steps can run a few minutes after the exact time.
What the refund policies do
Your policy is used when you cancel an attendee’s booking, and when you cancel the whole event and choose Follow each booking’s policy. Attendees can’t cancel a booking themselves in MyWellOps.
- Flexible. A full refund 14 days or more before the start. 50% after that.
- Moderate. A full refund 30 days or more before. 50% from 7 to 29 days before. Nothing in the last 7 days.
- Strict. The deposit isn’t refunded. The rest is refunded 7 days or more before the start. Nothing after that.
- Custom. Your wording is shown to attendees. MyWellOps doesn’t refund anything automatically, so handle refunds yourself.
The MyWellOps platform fee is never refunded, whatever your policy.
Cancellation & transfers is wording that attendees see at checkout and on their booking. There’s no button to move a place to another person or event, so arrange any change with the attendee yourself.
Change or unpublish a live event
- On the event’s page, select Edit. Your changes save as you go, or select Save changes. The footer reads Changes go live as soon as they save.
- Once a place has sold, the currency is locked, and you can’t remove that tier. To stop selling a tier, set its Place limit to the number already sold, or end its sale window.
- Changing prices doesn’t affect bookings already made.
- To take an event down before anyone has booked, select Unpublish, then Unpublish again to confirm. It goes back to a draft and disappears from your booking page and website. Once places have sold, Unpublish isn’t shown. Cancel the event instead.
Good to know
- Each payment, deposit and balance alike, carries your plan’s platform fee. The event dashboard shows the rate. Stripe’s own processing fee is taken separately in Stripe.
- The add-on’s monthly price is separate from the platform fee.
- A free event takes no payment, so there are no deposits or extras. Tiers, places and the waitlist work the same.
- When someone starts checking out, their place is held for 10 minutes while they pay.
- You can add up to 20 tiers and 20 extras. Max places per booking can be from 1 to 50.
Troubleshooting
I see Not quite ready to publish. The message says what’s missing. The usual ones are Set a start date and time., Add the address., Add at least one pricing tier., Tier 1 needs a name. and Set the deposit amount. The start can’t be in the past. A Public event also needs Booking page or My website turned on.
I see Stripe is still checking your details. Stripe hasn’t finished verifying your account. Select Open Stripe to see if anything’s still needed, then publish when it’s done.
The Deposit option switch is greyed out. The tier’s price is 0. Give it a price first.
I can’t change the currency. It locks once the first place sells.
I can’t remove a tier. Places have sold on it. Set its Place limit to the number sold to close it instead.
I see Retreats & Events add-on required. Your add-on isn’t on. Turn it on from Events → Add-on & billing.